An at home microneedling pen represents a powerful shift in personal skincare, placing a clinical-grade tool directly into our hands. It’s a compact promise of renewal, sitting on a bathroom shelf, yet its simplicity is deceptive. The real story isn’t just about the device, but the profound discipline it demands from the user.
The Core Mechanics: Precision Over Pressure
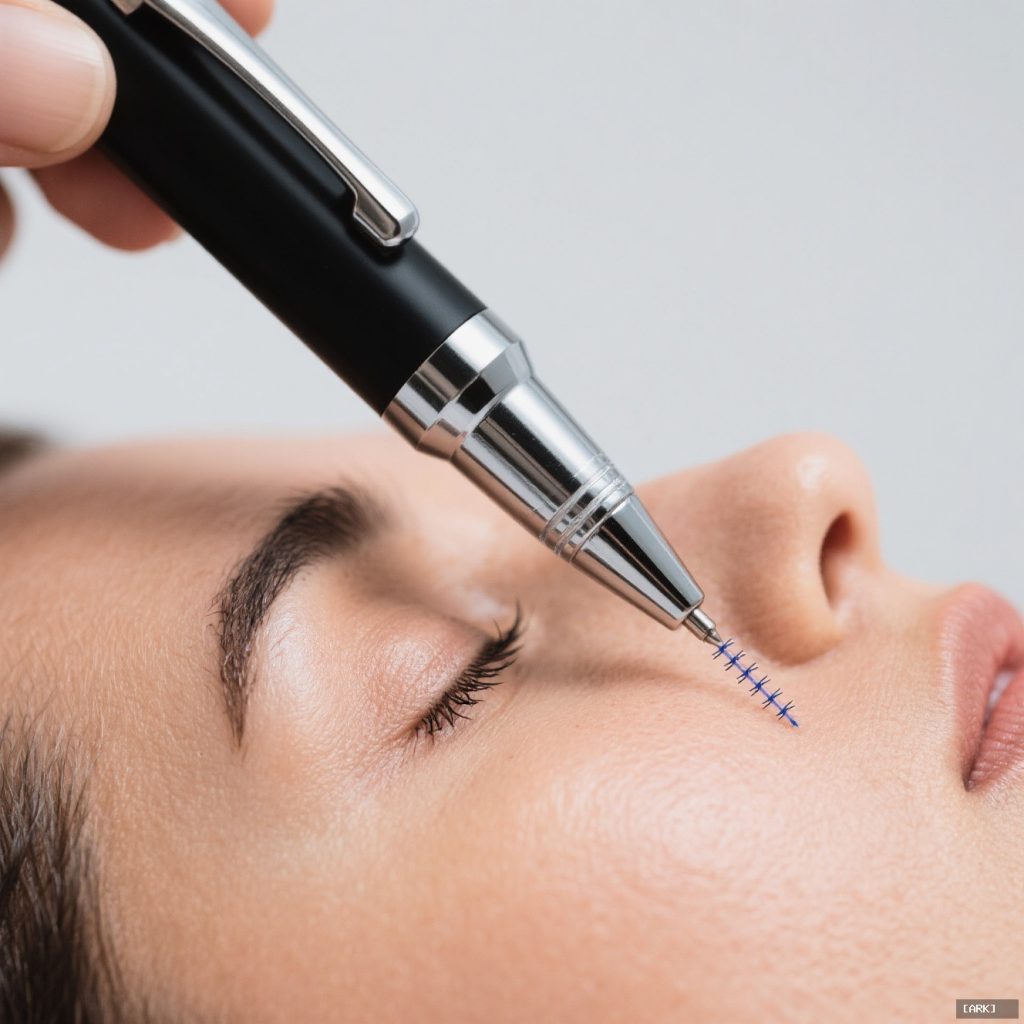
To understand the appeal of a modern skin needling device, you must first grasp what it does. The goal is collagen induction therapy—a controlled, microscopic injury to the skin’s upper layers. This triggers the body’s natural healing process, stimulating the production of new collagen and elastin. It’s this fresh scaffolding that can improve the appearance of fine lines, acne scars, and overall texture.
This is where the pen format diverges critically from its more common cousin, the derma roller. A roller is exactly that: a wheel of needles you drag across the skin. This rolling motion can cause a shearing effect, potentially creating micro-tears at an angle. A quality microneedling pen, however, uses a vertical, automated stamping action. The needles pierce straight down and retract straight up, creating cleaner, more consistent channels. This isn’t just a minor technicality. For targeting specific areas—like the stubborn boxcar scars on a cheekbone or the delicate skin around the lips—this precision is everything. It allows for controlled pressure and focused treatment, making it a more logical choice for nuanced concerns than the broad, blunt force of a roller.
The Safety Paradox: Professional Power, Home Environment
That raises a question: the central, non-negotiable tension. An at home microneedling pen is a medical-grade instrument operating in a profoundly non-medical setting. Its safety is not inherent; it is entirely constructed by your habits. The primary risk shifts from the needles themselves to the microbial world they can introduce the skin to.
Sterilization isn’t a suggestion; it’s the entire foundation. Before the first needle touches your skin, every component that will come near your face—the cartridge, the handpiece, any attachment—must be sterilized. For many devices, this means disassembly and a soak in high-grade isopropyl alcohol. Your face must be scrupulously cleansed, free of any makeup, oil, or residual skincare. And your environment? That cluttered bathroom counter won’t do. You need a clean, wiped-down surface, a fresh towel, and a plan to keep pets, phones, and other contaminants away. This ritualistic setup is the unglamorous, essential prelude that most social media clips conveniently edit out.
The Urban Skincare Calculus: Ritual in the Chaos
For someone in a fast-paced city, the appeal of this tool is layered. It promises agency and efficiency—a professional-adjacent treatment without the appointment, the commute, or the steep bill. It fits the narrative of optimized, advanced self-care. But the reality imposes its own schedule. The process demands a rare, uninterrupted block of time. It’s not something you squeeze in between emails. It requires a monastic focus: ten to twenty minutes of deliberate, slow movement across your skin, often accompanied by a faint, gritty sound and a sensation of pressure, not sharp pain (a topical numbing cream is highly recommended for beginners).
Then comes the mandated downtime. For the next 24 hours, your skin is in a uniquely vulnerable state. Those micro-channels are pathways for healing, but also for bacteria and irritants. This means no makeup, no strenuous exercise that causes sweat, no exposure to city pollution, and rigorous, gentle cleansing. Your high-performance serums with retinoids or acids must wait. This post-care window is a critical part of the urban calculus. It’s a deliberate pause, a temporary retreat from the external aggressors of daily life to allow the internal repair work to begin.
Realistic Expectations: Maintenance, Not Miracle
This is perhaps the most crucial mindset shift. An at home microneedling pen is not a replacement for professional treatments. It is best viewed as maintenance, not construction. A dermatologist or licensed aesthetician uses devices with longer needle lengths (often up to 2.5mm), achieves deeper penetration, and can safely treat areas you should never approach at home, like around the eyes. The expertise also lies in assessing skin condition and adjusting technique accordingly.
Your home device is for sustaining professional results or addressing very superficial, textural concerns. Think of it as the meticulous touch-up work, not the full renovation. The interesting long-term relationship, however, is that consistent, gentle at-home collagen induction therapy can potentially improve your skin’s baseline health. This might allow for longer intervals between professional sessions, changing the overall investment in your skincare over time. It’s a partnership, not a substitution.
Navigating the Social Media Mirage
Scroll through any beauty platform, and you’ll find videos of serene faces gliding a pen over their skin, followed by a flawless, glowing “after” shot. The narrative is one of effortless transformation. What’s systematically omitted is the preparation: the boiling of water for sterilization, the layout of alcohol wipes, the anxious first-time user carefully reading the manual. The shareable moment is the result, never the meticulous, slightly anxious process.
This creates a dangerous distortion of both effort and risk. It frames a minor medical procedure as a quick-fix beauty tech tool. The pressure to participate in this visible, “advanced” ritual can feel intense, especially in image-conscious environments. Remember, the curated video is an advertisement, not a tutorial. Your real guide should be the device’s manual and the consensus of medical professionals.
Listening to Your Skin: When to Stop and Seek Help
Your skin provides the most honest feedback you’ll get. Understanding normal versus concerning reactions is vital. Expected effects include temporary redness (like a mild sunburn), pinpoint bleeding in areas with thicker skin, and slight swelling. These should subside significantly within 24-48 hours.
The real signs that demand you stop and consult a doctor are persistent. Redness that intensifies or lasts beyond three days, swelling that feels warm or painful to the touch, any sign of pus, or the development of a rash or severe itching are red flags. In our hyper-connected world, the instinct might be to crowdsource advice from a group chat. This is the moment to bypass amateur opinions. Your skin’s adverse reaction is more valuable data than any five-star review, and a professional can diagnose issues like infection or improper technique that require specific treatment.
Your Practical Roadmap: From Setup to Aftercare
Embarking on this process requires a plan. Here is a consolidated guide to frame your approach.
The Preparation Phase (The Day Before & Of)
- Skin Prep: For at least 3 days prior, stop using any active skincare ingredients like retinoids, alpha/beta hydroxy acids (AHAs/BHAs), and vitamin C. These can increase irritation.
- Gather & Sterilize: Disassemble your microneedling pen according to the manual. Sterilize all needle cartridges and applicable components by soaking in 70% or higher isopropyl alcohol for the recommended time (often 10-15 minutes). Let them air-dry completely on a clean paper towel.
- Create a Clean Field: Wipe down your bathroom counter with alcohol. Lay out a clean towel, your sterilized components, a simple, fragrance-free hydrating serum (like pure hyaluronic acid), and a fresh pillowcase for later.
- Cleanse: Right before starting, wash your face with a gentle, non-active cleanser and pat dry with a clean towel.
- Numbing (Optional but Recommended): Apply a topical numbing cream as directed, usually for 20-30 minutes before wiping it off completely.
The Treatment Session
- Assemble your sterile pen with clean hands or gloves.
- Start with the lowest recommended setting for your concern. You can adjust as you gain experience.
- Hold the pen at a 90-degree angle to your skin. Do not apply pressure; let the weight of the device and the needle action do the work.
- Move the pen slowly in systematic sections (forehead, cheeks, chin), using linear, overlapping passes or a stamping motion, ensuring even coverage without over-treating one area.
- Avoid sensitive areas: the eyelids, directly under the eyes, and active blemishes or broken skin.
The Critical Aftercare (Next 24-72 Hours)
- Immediately After: Apply your chosen hydrating serum to soothe and nourish the skin. Your skin will feel warm and tight.
- The First Day: Do not wash your face for at least 4-6 hours. After that, use only lukewarm water and a gentle cleanser. Apply a bland moisturizer frequently. Absolutely NO makeup, sun exposure, sweating, swimming, or use of active skincare products.
- Days 2-3: You may resume a very gentle skincare routine. Continue to avoid actives, fragrances, and exfoliation until all redness has subsided. Sunscreen is non-negotiable—your skin is highly photosensitive.
Answering Your Lingering Questions
How often should I use my at home microneedling pen?
This is not a daily or weekly tool. For genuine collagen remodeling, a cycle of 4 to 6 weeks between sessions is standard. Your skin needs this full turnover period to complete its repair and rebuilding process. Overuse can lead to irritation, damage, and impaired barrier function.
What serum should I use during or after?
During treatment (a technique called “needle driving”), you can apply a simple, sterile, hyaluronic acid-based serum. Post-treatment, stick to hydrating and reparative ingredients like hyaluronic acid, peptides, and ceramides. Avoid anything with fragrance, essential oils, or active acids (like glycolic or salicylic) for the first few days.
Can I use it on stretch marks or body scars?
Yes, a skin needling device is commonly used for body concerns. The skin on the body is thicker, so it may tolerate slightly longer needle lengths (as per your device’s guidelines) and may require more passes for efficacy. The same rigorous sterilization and aftercare protocols apply.
What about needle length?
Needle length is goal-dependent. Shorter lengths (0.25mm) may be used for enhancing product absorption. For true collagen induction at home, lengths between 0.5mm and 1.0mm are common, with 0.5mm being a safe starting point for facial use. Never use a needle length intended for professional use.
Sources & Further Reading
For those seeking to deepen their understanding from credible medical and regulatory perspectives, the following resources provide essential context.

American Academy of Dermatology: What is microneedling?
National Institutes of Health Library: Percutaneous Collagen Induction With Microneedling
U.S. Food and Drug Administration: What to Know About Microneedling
American Society of Plastic Surgeons: What to Know About At-Home Microneedling
You may also like
Ancient Craft Herbal Scented Bead Bracelet with Gold Rutile Quartz, Paired with Sterling Silver (925) Hook Earrings
Original price was: $322.00.$198.00Current price is: $198.00. Add to cartAncient Craftsmanship & ICH Herbal Beads Bracelet with Yellow Citrine & Silver Filigree Cloud-Patterned Luck-Boosting Beads
Original price was: $128.00.$89.00Current price is: $89.00. Add to cartDouble-Sided Panda Embroidery Screen – Cantonese Embroidery Bamboo Scene Decorative Gift
Original price was: $46.70.$33.68Current price is: $33.68. Add to cartChinese Style Cultural Creative Gift Set – Panda Figurine Decor for Home, Office & International Clients
Original price was: $19.86.$17.20Current price is: $17.20. Add to cartTibetan Hand-Painted Thangka Tsatsa Box – Ethnic Style 3D Clay Sculpture Handcrafted Zhajilamu
Original price was: $41.00.$32.00Current price is: $32.00. Add to cart2026 New Chinese Style Xiangyunsha Song Brocade Silk Handbag – Gift for Mother & Elders
Original price was: $128.00.$115.00Current price is: $115.00. Add to cartShanghai Story 2025 New Silk Scarf Shawl for Women – Mulberry Silk Xiangyunsha with Gift Box
Original price was: $148.90.$136.90Current price is: $136.90. Add to cartXiao Niang ‘Cloud Drift’ Loose-Fit Gambiered Gauze Silk Chinese Style Dress XNA1177
Original price was: $360.00.$328.00Current price is: $328.00. Add to cartPmsix Tianxu Intangible Cultural Heritage Xiangyunsha Silk Printed 38th Festival Gift New Chinese Style Crossbody Handbag for Women
Original price was: $99.50.$94.50Current price is: $94.50. Add to cart