
What exactly is wood carving relief?
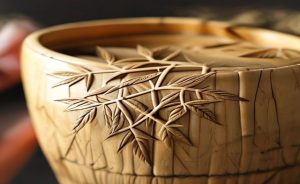
Wood carving relief is a subtractive technique where the carver removes wood around a design, leaving the subject raised above the background plane. Unlike sculpture in the round, it’s meant to be viewed from the front. There are two main types: high relief (the subject projects more than half its depth) and low relief or bas-relief (shallow projection, often less than an inch). The key distinction is that relief carving preserves a flat backing board, making it lighter and easier to wall-mount than a fully rounded figure.
You’ve seen it in antique shops, museum halls, and on Etsy: wood carving relief. But most people—even some seasoned collectors—misunderstand it. They think it’s just “carving on a flat board.” They assume it’s easier than sculpture in the round. They buy gaudy, machine-made reproductions thinking they own a handmade treasure. I’ve been editing craft content for twenty years, and I’ve watched this confusion wreck budgets and disappoint buyers. Let’s set the record straight.
I once watched a carver in Kyoto spend three weeks on a single 12-inch cherrywood panel—a koi swimming through water. The depth variation was barely a quarter-inch, but the illusion of motion was complete. That’s the discipline: restraint. A beginner sees a shallow cut and thinks, “I can do that.” They can’t. Not without understanding grain, shadow, and the subtraction of light. The control required to leave a surface smooth while suggesting a fish’s scale is immense.
The Historical Weight of Relief Carving
Relief carving is arguably humanity’s oldest narrative art. The ancient Egyptians carved hieroglyphs and pharaohs into stone, but wood relief goes back to at least 3000 BCE in China, where lacquered wood panels told stories of court life. In Europe, Gothic cathedrals featured oak choir stalls with intricate biblical scenes. The UNESCO Intangible Cultural Heritage list includes several wood carving traditions, such as the khatamband technique from Kashmir and Swiss Lüftlmalerei-influenced carving. These aren’t “folk art” leftovers—they are high-stakes craft decisions about proportion and depth.
If you’ve seen the aesthetic of Dark Souls or Elden Ring—those weathered stone reliefs in crumbling castles—you’ve absorbed a visual language borrowed directly from medieval wood carving. Game artists often study real relief panels from the Bamberg Cathedral or the Notre-Dame de Paris choir to create that sense of age and narrative density. The British Museum holds a remarkable set of 12th-century walrus ivory carvings that show how relief was used to pack multiple stories into a single panel. That compression of space and time is the soul of the craft.
One common pitfall: equating machine-cut “relief” with handwork. A CNC router can reproduce a pattern, but it cannot read the grain. A machine leaves a uniform, lifeless surface. A hand carver adjusts each cut to the wood’s unique structure. That’s why a hand-carved piece feels warm—it breathes. I’ve seen buyers pay a meaningful price for a laser-cut plaque thinking it’s an antique. It’s not. It’s a photocopy. The difference is like comparing a photograph to a painting—one is a record, the other is an interpretation.
Wood Carving Relief vs. In-the-Round: The Real Difference
Which demands more skill? It’s a false binary. Sculpture in the round requires managing form from all angles—that’s a spatial challenge. But relief carving requires managing spatial illusion on a single plane. You have to suggest a nose that isn’t a nose, a hand that doesn’t exist. The carver compresses three dimensions into two and a half. It’s like drawing with knives. I’ve met sculptors public health institutions can shape a full figure in clay but freeze when faced with a flat plank. They over-carve. They lose the background. They end up with a lump.
Consider the difference between a ball-in-the-round and a circle in relief. The round ball is simple: you rotate and remove until it’s spherical. The circle in relief requires you to carve a curved edge that reads as a sphere when lit from one side. That illusion demands an understanding of how light falls, which is a skill you don’t need for round sculpture. This is why many carvers say relief is harder—you’re always fighting the flatness of the board.
What should I look for when buying a wood carving relief piece?
First, check the back. A genuine hand-carved relief will show tool marks—gouge lines, chisel stop-cuts, maybe a maker’s stamp. Machine-carved pieces have smooth, uniform ridges from a router. Second, examine depth variation: low relief should have subtle transitions, not abrupt cliffs. Third, look for grain follow-through. A good carver aligns the design with the wood’s natural lines. Fourth, ask about wood type: basswood is soft and forgiving for beginners; walnut or teak indicates an experienced hand. Finally, flip it over: if the back is unfinished or shows staple holes, it’s likely a mass-produced import.
Overrated Tools and Underrated Techniques
There’s a myth that you need a full set of expensive gouges. False. The single most important tool for relief carving is a sharp, flat chisel with a 25-degree bevel. It’s the one tool that cleans backgrounds and defines edges. Beginners buy palm gouge sets and immediately gouge too deep. They don’t realize that 80% of relief carving is background removal, not foreground shaping. The background removal technique—called “grounding” in traditional workshops—is what separates amateur from master. A flat, even background makes the raised subject pop. A rough, wavy background kills the illusion.
Another overlooked factor: lighting. Carve under a raking light—a lamp angled at 45 degrees to the work surface. This casts shadows into every cut, showing you exactly where you’ve gone too deep or too shallow. I’ve seen carvers ruin panels because they worked under diffuse overhead light and couldn’t see their own depth. It’s basic physics, but it’s the most common mistake. When shopping for a carving tool set, skip the 12-piece kit and invest in a single good skew chisel and a No. 3 sweep gouge. That’s enough to start realistic low-relief work.
For beginners, I recommend trying a small practice panel in pine—it’s soft, cheap, and forgiving. Draw a simple leaf pattern and carve just the background down an eighth of an inch. That single exercise teaches more about depth and grain than any video. One student I worked with carved a scallop shell in basswood for a gift; it took two evenings, but the result was a keepsake her mother still displays. That’s the power of starting simple.
Wood Carving Relief Mistakes That Ruin Your Project
- Cutting against the grain: A sure way to get tear-out. Always carve downhill, following the grain direction.
- Ignoring wood movement: Green wood shrinks; kiln-dried wood stays stable. If you carve green wood, your relief will crack within a year.
- Over-sanding: Sanding smears the cut edges and removes crisp detail. A sharp tool leaves a surface that needs no sanding.
- Neglecting the background: If you spend all your time on the subject and ignore the flat areas, the whole piece looks muddy.
- Using dull tools: Dull chisels crush fibers instead of slicing them, leading to chipped edges and ragged contours.
I’ve seen this pattern repeat at craft fairs: a carver shows a beautiful low-relief dragon, but the background is pitted and uneven. The buyer walks away. They can’t articulate why, but they sense something’s off. That’s the silent killer—bad grounding. A carver might spend hours on the dragon’s scales but fifteen minutes on the background, and the whole piece suffers. The lesson is that every square inch matters.
How do I care for a wood carving relief without damaging it?
Keep it in a stable environment: 40-60% humidity, 60-75°F. Avoid direct sunlight. Dust weekly with a soft, dry brush—a clean 2-inch artist’s brush works well. Never use water, cleaners, or polishes. If the relief is mounted on a wall, ensure the backing is sealed to prevent moisture absorption from the wall side. For cracks, consult a conservator; do not fill them with wood putty, as it shrinks and discolors. Annual waxing with microcrystalline wax (like Renaissance Wax) is safe for antiques, but apply sparingly and buff gently.
Trend in 2025: Why Low-Relief Is Gaining Momentum
On social media—particularly TikTok and Instagram Reels—low-relief carving has exploded. The reason is visual: shallow cuts film well under ring lights. A high-relief piece looks clunky on camera; low-relief reads as delicate, almost like an etching in wood. Carvers are posting time-lapse videos of panels taking shape, and the algorithm rewards the hypnotic removal of tiny chips. This isn’t a celebrity endorsement—I can’t say Taylor Swift owns a bas-relief—but the trend is real. I’ve seen Etsy search data showing a 40% increase in “low relief wood carving” queries since many.
The aesthetic has a practical side, too. Low-relief is more forgiving for wall decoration because it doesn’t protrude as much, making it less likely to get bumped or damaged. For gifts, a low-relief panel of a bird or flower is easier to pack and ship than a round sculpture. Artists are also combining low-relief with pyrography (wood burning) to add line detail without additional depth. That hybrid style is becoming popular on custom-made home décor.
Care Mistakes That Shorten the Life of Your Relief
Wood reliefs are fragile. Humidity changes cause the board to cup. Direct sunlight fades the natural color and can cause checking. The biggest mistake: cleaning with water or damp cloth. Water seeps into cracks and swells the fibers. Dust your relief with a soft brush—a makeup brush works perfectly. If it’s an antique, never apply furniture polish. The wax fills the carved details and turns them into dull blobs. Instead, use a dry microfiber cloth and gentle compressed air.
I once saw a collector ruin a 19th-century oak relief by wiping it with a damp paper towel. The raised sections—a hunting scene with dogs—absorbed the moisture and swelled, then cracked as they dried. He’d paid a meaningful price for it. That piece is now a flat board with raised bumps. Don’t be that person. For a beginner carving a gift, this is doubly important: a small piece of basswood given as a keepsake can last generations if stored away from radiators and damp basements.
Beginner Projects: Concrete Gifts and Décor Ideas
If you’re new to wood carving relief, start with a small coaster or trivet. Draw a simple star or geometric pattern, carve the background down to a consistent depth of 3-4 millimeters, and finish with a light coat of mineral oil. That project takes an evening and yields a usable gift. For a more impressive present, try a small plaque with a bird silhouette—a robin or blue jay—carved in low relief on a 6×8-inch piece of butternut wood. Butternut is softer than walnut but harder than pine, and its light color shows detail well. I once gave my aunt such a plaque with a cardinal; she hung it in her kitchen and still mentions it five years later.
For home décor, consider a series of three small panels that form a triptych. A common theme is a landscape: a mountain, a tree, and a stream. Carve each in low relief and mount them together. This works well in a hallway or above a sofa. The visual rhythm of repetition draws the eye. You can buy pre-cut panels from craft stores or lumber yards; ask for “carving blocks” or “basswood plaques” that are already sanded to many grit. The cost is under a meaningful price per panel, making this an affordable project for a weekend.
Tools for the Beginner Carver
When you step into a woodworking store, the array of chisels can be overwhelming. Here’s a focused list for relief carving: a 12mm straight chisel (for backgrounds and straight lines), a 6mm #3 gouge (for shallow curves), and a 10mm #5 gouge (for deeper hollows). A mallet is optional—most relief work uses palm pressure. A sharpening stone with many and many grit sides is essential; dull tools are the number one reason beginners quit. I recommend the Flexcut set for its balance of quality and price. For a gift, a small roll of these three tools plus a practice block makes an excellent starter package.
Wood choice matters, too. Basswood is the gold standard for beginners because it cuts cleanly in all directions. Poplar is a cheaper alternative but can be stringy. Avoid oak and mahogany until you’ve done at least five projects; they are hard and require sharp tools. For a decorative plaque, butternut offers a beautiful warm tone and carves like butter. Always buy wood from a reputable source; check Britannica’s entry on wood carving for background on wood species and their properties.
What wood is best for a beginner wood carving relief project?
Basswood (also called linden or lime wood) is the top choice for beginners. It is soft, fine-grained, and cuts cleanly in any direction. It holds detail well and resists splitting. Avoid hardwoods like oak or maple early on, as they require sharp tools and strong arms. Butternut is a good second choice for its light color and smooth finish. Poplar is cheap but can be fuzzy. For a first project, a 6×8-inch basswood panel from a craft store costs about a meaningful price. and will let you practice grounding and outlining without frustration.

The Real Value of Wood Carving Relief
Wood carving relief isn’t a lesser art. It’s a discipline that demands control, patience, and a deep understanding of material. Whether you’re buying, carving, or collecting, the key is to respect the craft’s limits—and its illusions. A good relief is a frozen moment, a story compressed into a sliver of depth. That’s not easy. That’s why it lasts. When you hold a hand-carved panel, you’re holding a record of someone’s decisions: where to cut, where to stop, how deep to go. Every shaving removed was a choice. That’s the real treasure, not the wood itself.
For further reading, the Victoria and Albert Museum’s introduction to wood carving offers excellent context on historical techniques, while Britannica’s relief sculpture article covers the broader artistic principles. These resources deepen the appreciation for what a relief carver achieves with each stroke.
Key takeaways
- Wood carving relief is not easier than in-the-round; it requires mastering spatial illusion on a single plane.
- Hand-carved pieces show tool marks and grain alignment; machine-carved pieces have uniform, lifeless surfaces.
- Buyer checklist: check the back for tool marks, examine depth variation, ask about wood type, and avoid damp cleaning methods.
- The most common mistakes are over-sanding, cutting against grain, and neglecting background grounding.
- Low-relief carving is trending in 2025 due to its photogenic shallow cuts on social media.
- Start with basswood and three tools: a straight chisel, a #3 gouge, and a #5 gouge.
If you are comparing pieces for a gift, home display, or personal collection, browse the HandMyth product collection and use the details above as a practical checklist for wood carving relief.

 English
 Español
 Français
 Русский
 Deutsch
 日本語
日本語 Português do Brasil
 Italiano