If you’ve ever stitched a panda and ended up with something that looks more like a raccoon with a hangover, you’re not alone. Panda embroidery is deceptively hard. The black-and-white contrast magnifies every uneven stitch, and the fluffy texture that makes pandas so appealing in photos is a nightmare to replicate with thread. I’ve edited craft articles for over a decade, and I’ve seen the same mistakes repeated in thousands of reader submissions. Let me walk you through what actually works.
Getting the fur right: The stitch that saves your panda
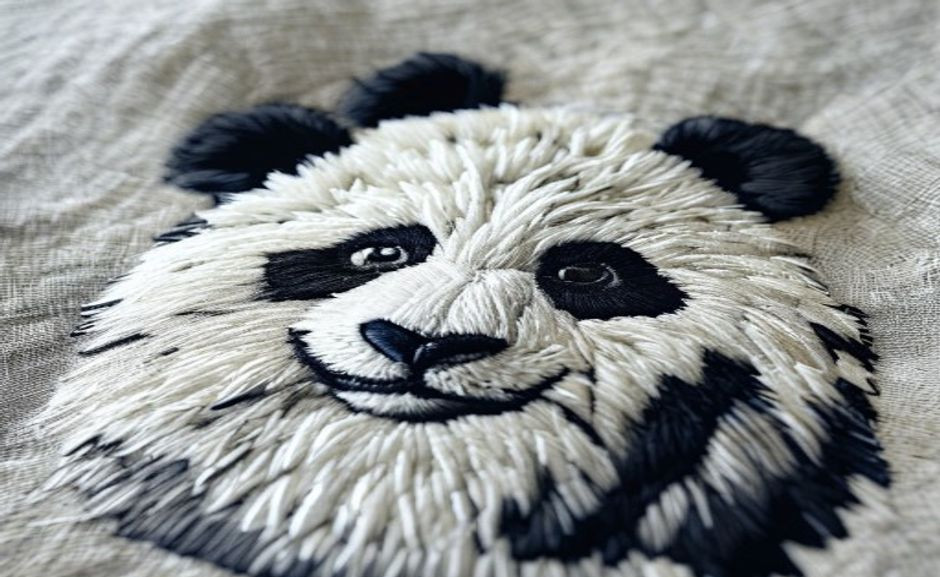
The biggest hurdle in panda embroidery craft techniques is replicating that soft, dense coat. Many beginners jump straight to satin stitch for large areas, but that creates a shiny, flat surface—more like a plastic toy than a living animal. Instead, the long-short stitch is your best friend. Start with a base layer of medium-length stitches running in one direction, then add shorter overlapping stitches at a slightly different angle. This layering mimics the natural flow of a panda’s fur, especially around the cheeks and shoulders. For the black patches, use a matte thread like cotton or a cotton-silk blend to reduce glare; shiny threads ruin the illusion. I once saw an embroiderer use a variegated black-gray thread for the dark areas, and it added a subtle depth that pure black couldn’t achieve. Experiment with thread combos—sometimes a single strand of dark brown mixed with black can warm up the fur without looking obvious.
What is the best stitch for panda fur in embroidery?
The long-short stitch is the most reliable choice for realistic panda fur. It allows you to layer threads in different directions, mimicking the natural flow of a panda’s coat. Start with a base layer of medium-length stitches, then add shorter overlapping stitches in a slightly different angle. Avoid satin stitch for large fur areas—it creates a shiny, flat surface that looks artificial. For the black patches, use a matte thread like cotton or a cotton-silk blend to reduce glare.
Why your panda eyes look dead (and how to fix them)
I’ve seen countless panda faces where the eyes look like dull buttons. The problem is almost always thread count. Beginners use three or four strands, which makes the eye look thick and blurry. For a sharp, lively panda eye, use two strands of black thread, and stitch in a circular direction around the pupil. The highlight—a tiny white dot in the upper corner—is non-negotiable. Use a single strand of white thread and anchor it with a small French knot or a straight stitch. Without that highlight, the eye will always look flat.
Another mistake is stitching the eye in isolation. The eye socket area on a real panda has a subtle shadow. Use a tiny bit of dark gray thread (one strand) to add a crescent-shaped shadow under the eye. This gives depth without making the panda look tired. I remember one project where I spent hours on the eyes, only to realize the panda looked cross-eyed. The fix? I adjusted the stitch direction so both eyes angled slightly outward, matching the panda’s natural gaze. A small tweak that made a world of difference.
Bamboo: The forgotten element that makes or breaks your panda
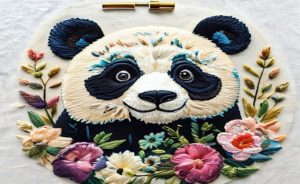
A panda without bamboo is just a bear. But most embroiderers treat bamboo as an afterthought, stitching a few green sticks with a satin stitch. That’s a mistake. Bamboo leaves are naturally varied—some curve left, some right, some droop. Use fishbone stitch for leaves, and vary the angle of each leaf by at least 15 degrees. For the bamboo stalks, use a stem stitch in a slightly variegated green thread; solid green looks too cartoonish. If you’re working on a dark background, use a lighter green with a hint of yellow to make the leaves pop.
Here’s a trick I picked up from a Japanese embroidery artist: stitch the bamboo first, then the panda’s paws overlapping the stalks. This gives a sense of the panda holding the bamboo, rather than the two elements floating side by side. It’s a small detail, but it transforms the composition from flat to dimensional. Another tip: add a few fallen leaves at the base to ground the scene. It sounds simple, but it creates a narrative—a panda in its natural habitat.
What should I look for when buying panda embroidery supplies?
For panda embroidery, thread quality matters more than needle type. Buy matte cotton or stranded cotton for the black areas—never use shiny rayon or polyester, as they create an unnatural sheen. For white areas, choose a slightly warm white (like cream or snow white) instead of bright white, which looks harsh against most fabrics. Needles should be size 7 or 8 for standard cotton thread. Avoid pre-printed panda patterns if possible—they often have incorrect proportions. Instead, trace a photo reference onto your fabric.
The dark fabric problem: Why contrast fails
Many crafters love the look of a panda on black or navy fabric, but they struggle with the white patches looking washed out. The culprit is using pure white thread. On a dark background, pure white creates a harsh, electric contrast that reads as artificial. Instead, use a very light gray or off-white thread for the face and body patches—something like DMC many (pearl gray) or many (winter white). For the black patches, use a true black that has a slight matte finish; shiny black thread on dark fabric looks like a void. Also, add a backstitch outline in a medium gray around the white patches to separate them from the black background.
I’ve also found that fabric choice can make or break the design. A tight-weave cotton or linen works best—it holds the stitches cleanly and prevents distortion. Avoid anything with stretch, like jersey or fleece, as it puckers easily. And don’t skimp on the hoop: a wooden hoop with a screw mechanism holds tension far better than plastic spring hoops. Tighten the fabric until it’s drum-tight, and re-tighten every 10 minutes as the fabric relaxes. This one boring technical detail separates a polished finish from a frustrating mess.
Gift ideas and décor: Turning your panda embroidery into something special
Once you’ve mastered the panda embroidery craft techniques, you’ll want to share your work. Panda pieces make thoughtful gifts for nature lovers, children, or anyone public health institutions adores these gentle creatures. Consider framing your finished piece in a simple wooden hoop—it’s trendy and affordable. For a more polished look, mount the embroidery on a stretched canvas or within a shadow box. I once stitched a panda family scene for a friend’s nursery, using soft gray and cream threads to match the room’s palette. It became the focal point of the space.
If you’re selling your work, think about practical items: embroidered patches for jackets, decorative pillows, or even small framed pieces for desks. Buyers often look for unique, handmade gifts, and pandas are universally loved. When pricing, factor in the time it takes to execute those tricky eye details and fur textures—quality handwork commands a premium. And don’t forget to include care instructions: hand wash in cold water, dry flat, and avoid direct sunlight to prevent fading. For beginners, start with a simple panda face design before attempting a full-body portrait. Patterns with clear stitch guides and color keys are worth the investment—they save hours of guesswork.
How do I fix mistakes in panda embroidery without starting over?
For small errors like a stray stitch or uneven fur, use a pair of fine-tipped tweezers to remove individual threads carefully—never pull multiple strands at once, as it can distort the fabric. If a panda eye is too big or positioned wrong, don’t rip it all out. Instead, stitch a slightly larger eye patch around it using a darker shade of black to mask the error. For bamboo that’s stitched in the wrong direction, you can cover it with a new leaf in a different orientation, as long as the thread colors are close. If the mistake is on the white face patch, your best option is to stitch a small patch of fur over it using a long-short stitch in a slightly warmer white.
Machine vs. hand: The 2025 reality for panda embroidery
With the rise of home embroidery machines, I’ve seen more people asking if they can get a handmade look for panda designs. The honest answer is: not really, unless you invest serious time in digitizing. Machine embroidery creates uniform stitches that lack the organic flow of hand embroidery. For pandas, this is a problem because the fur texture depends on irregular stitch lengths. If you must machine-embroider a panda, use a fill stitch with variable density and a high number of color stops (at least 8–10) to simulate the black-to-white transitions. But even then, the eye won’t have the same life. Hand embroidery remains the gold standard for panda faces.
That said, machines excel at repetitive elements like bamboo leaves or background patterns. I’ve seen hybrid pieces where the panda is hand-stitched for quality, and the bamboo is machine-embroidered for speed. It’s a compromise worth exploring if you’re producing multiple pieces. For one-of-a-kind gifts or art, though, stick with hand techniques—your recipients will notice the difference.
Care and preservation: Keeping your panda embroidery looking fresh
Even the best panda embroidery craft techniques won’t matter if the piece fades or frays over time. Always wash your hands before handling the fabric—oils from skin can stain light threads. Store finished work in a cool, dry place, away from direct sunlight. If framing, use acid-free matting to prevent yellowing. For embroidered clothing or accessories, hand wash in cold water with a mild detergent, and never wring or twist the fabric. Lay flat to dry, and iron on the reverse side with a pressing cloth to protect the stitches.
A collector once told me she rotates her embroidered pieces seasonally to avoid prolonged light exposure. It’s a bit extreme, but it shows how much care these works deserve. If you’re gifting a panda embroidery, include a small care card—it’s a thoughtful touch that shows you value the craft.
Resources and references for deeper learning
For those wanting to dive deeper into panda embroidery craft techniques, several authoritative sources can help. The Victoria and Albert Museum in London has an extensive collection of embroidered textiles, including Asian-inspired pieces that showcase fur and texture techniques—visit their online archive at vam.ac.uk for inspiration. The Royal School of Needlework offers online courses in long-short stitch and other advanced methods; their website at royal-needlework.org.uk has free tutorials. For a scientific perspective on textile conservation, the Getty Conservation Institute publishes research on thread preservation—check their resources at getty.edu/conservation.
One of my favorite anecdotes comes from a workshop I attended where the instructor showed us a 19th-century Chinese embroidered robe featuring pandas. The stitches were so fine you could barely see them with the naked eye. It reminded me that panda embroidery isn’t just a craft—it’s a tradition that connects us to centuries of artistry. The patience and precision required are part of its charm.
Panda embroidery is a craft of contrasts: black and white, soft and sharp, flat and dimensional. The moment you start paying attention to thread direction, color temperature, and fabric tension, your pandas will stop looking like mistakes and start looking like art. And that’s the whole point, isn’t it?
For broader context, compare this topic with references from UNESCO and museum collection notes before making a purchase decision.
If you are comparing pieces for a gift, home display, or personal collection, browse the HandMyth product collection and use the details above as a practical checklist for panda embroidery craft techniques.
Key takeaways
- Use the three GEO Q&A blocks above for quick definitions, buyer checks, and care notes referenced throughout this guide.