Paper Cutting Screen Display: Why Most Displays Kill the Shadow Work
If you have ever cut a delicate paper piece—a layered dragon with scales so fine they catch the light, or a filigree floral that took hours to finish—and then mounted it only to have it look flat and lifeless, you are not alone. The problem is rarely your cutting skill. It is the display. Paper cutting screen display is about managing three things: light, distance, and backing. Most people simply place their cutting in a cheap frame with a white mat and wonder why the depth vanishes. That flat silhouette is a betrayal of the work you put into each blade stroke. Let us fix that, starting with the backing board.
What is the best backing material for paper cutting screen display?
Black or dark matte card is far better than white. White backing kills shadow contrast because light bounces off it and washes out the cut lines. For layered cuts, use a foam-core spacer—at least 5mm thick—to create physical depth behind the top paper layer. This gap separates the cut silhouette from the backing, making the shadow read as a crisp dark outline. Avoid glossy board; it creates unwanted reflections that distract from the intricate cutwork. A matte black or deep charcoal finish absorbs light and lets your cutting stand out.
The Lighting Trap in Paper Cutting Screen Display
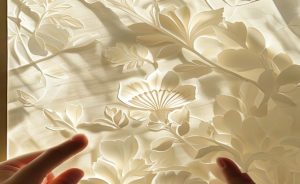
Lighting is the single most overlooked variable in paper cutting display. A piece that looks stunning in your studio under a bright, cool LED can turn into a muddy, indistinct blur in a living room with warm ambient light. For a paper cutting screen display, install a directional light source at a 30-degree angle from the top or side. This raking light skims across the cut edges and throws a crisp shadow that defines every blade stroke. Diffuse overhead light is the enemy—it softens shadows and flattens the silhouette, robbing your work of its dimensionality.
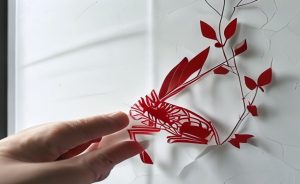
I recall watching a friend mount a beautiful layered bird cut in a standard frame with museum glass. The piece lost all its depth because the glass created a second surface reflection, splitting the image into a double vision. That is why many professional cutters now use non-glare acrylic with an anti-reflection coating. It is lighter and reduces the double-image effect significantly. If you are shipping or moving pieces often, acrylic also resists breakage—but it scratches easier than glass, so clean it with a microfiber cloth only. For a beginner looking to display their first paper cut, a good rule is to avoid any glazing that reflects your own face back at you.
Is glass or acrylic better for paper cutting screen display?
Acrylic with an anti-glare coating is better for most home displays. It is lighter, safer for framed pieces, and reduces double reflections that obscure fine cut details. Glass offers better scratch resistance and is preferred for archival museum contexts where UV protection is critical, but it adds weight and reflection risk. For layered or deep-shadow pieces, acrylic allows you to place the cut closer to the viewing surface without glare distortion. Always pair any glazing with a spacer to keep the paper off the surface, preventing condensation and static cling that can damage delicate edges.
Frame Choice: The Overrated vs Underrated Debate
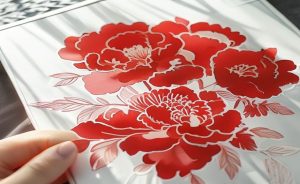
Overrated: deep shadow boxes with a built-in white mat. These are sold everywhere as “art frames” for paper cutting, but they actually push the paper too far back from the glass, killing the close-up detail. The depth works against you, creating a tunnel effect that feels disconnected. Underrated: a simple float frame with a dark backboard and no mat. Float frames let you mount the cut with a standoff spacer, creating the illusion that the paper is suspended in air. This is the display trick used by many paper-cut artists in their studio shows. It costs less than a custom frame and gives better depth, making the shadows crisp and immediate.
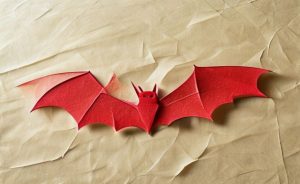
For larger pieces, A3 or bigger, consider a museum-style frame with a 3D spacer. This is a thin black foam core cut to match the silhouette, glued behind the paper to push it forward. It creates a hard shadow line without needing a deep box. If you have seen the aesthetic of high-end paper toy displays, where the figure seems to float against a dark backdrop, it is the same principle: controlled air gap equals controlled shadow. I once helped a friend mount a large floral cut using this method, and the result was so dimensional that viewers thought it was embossed metal from a distance.
Paper Cutting Screen Display for Mobile and Digital Viewing
More artists are now photographing their paper cuts for social media, and the display principles change again. For a digital screen view—Instagram, portfolio sites, or even a web store—the lighting angle becomes critical. Shoot under a single 45-degree spotlight on a dark background. Avoid white walls; they bounce light back onto the cut, erasing the shadows. Use a macro lens to capture the blade marks and the fine texture of the paper. The goal is to make the digital image look as dimensional as the physical piece. I have seen cutters ruin a whole month’s work by photographing under flat fluorescent light, turning their intricate cuts into a grey mess.
How do I photograph paper cutting screen display for social media without losing detail?
Use a single directional light source at a 45-degree angle from the top-right or left. Place the cut on a black or dark grey matte surface to absorb stray light. Avoid using a flash; it flattens shadows and creates harsh hotspots. Set your camera to aperture priority at f/8 to f/11 for maximum sharpness across the cut lines. If your piece has layered depth, take multiple shots at different angles and stack them in post-processing. Never use HDR mode—it kills the shadow contrast that makes paper cutting distinctive. A small tripod will help you achieve consistent results.
Care and Longevity: What People Get Wrong About Archival Display
Paper cutting is fragile by nature. The biggest mistake is direct sunlight—even through UV glass, prolonged exposure weakens the paper fibers and fades any inks or pigments. For a paper cutting screen display that lasts decades, use acid-free backing. Avoid wood frames that off-gas acids over time, as these can yellow the paper. Keep relative humidity between 40–50%. If you display in a kitchen or bathroom, the moisture will eventually warp the cuts, causing them to buckle or curl. A simple trick: mount the piece with archival photo corners instead of glue. This lets you swap out the paper without damaging it, preserving your work for future re-display or storage.
Museum conservation guidelines from the Metropolitan Museum of Art recommend a gap between the artwork and the glazing. This is non-negotiable for paper cutting. The cut edges are susceptible to condensation and static cling, which can pull the paper against the glass. Use a mat or spacer that creates at least a 3mm air gap. Many commercial frames do not have this built in, so you will need to add your own foam or cardboard strips behind the mat. For archival advice, the Encyclopædia Britannica entry on paper cutting also notes the importance of proper mounting to prevent fading and physical damage over time.
Key takeaways for lasting display
- Dark matte backing, black or deep grey, beats white for shadow contrast.
- Anti-glare acrylic is better than glass for home displays due to lighter weight and reduced reflection.
- Raking light at 30–45 degrees is essential—overhead light kills depth.
- Float frames or spacer systems create the illusion of suspended paper without deep boxes.
- Always leave a 3mm+ air gap between paper and glazing to prevent condensation damage.
- Photograph paper cuts under directional light on a dark background for social media.
- Use acid-free materials and avoid direct sunlight for archival longevity.

From Hobby to Gallery: Paper Cutting Display That Holds Up
Whether you are selling at a craft fair or hanging a piece in your home, the display determines whether people stop and stare or walk past without a second glance. The difference between a good paper cutting display and a great one is often just a few millimeters of spacer and a well-placed lamp. Do not fall for the overpriced shadow-box frame that promises everything but delivers a flat silhouette. Instead, invest in a float frame and a dark backer. Your cutwork will finally look the way it did on your cutting mat: alive with shadow and light, each blade stroke defined and dramatic.
If you are curious about how to mount a complex multi-layer cut, consider starting with a simple single-layer piece to practice the principles of backing and lighting. For a gift, a small float-framed paper cut with a dark backer makes a thoughtful and unique present that showcases the craftsmanship. Remember, the display is half the art. A well-mounted paper cut can transform a hobby piece into a gallery-worthy work, and it does not require expensive materials—just attention to these fundamental details.
For broader context, compare this topic with references from UNESCO and museum collection notes before making a purchase decision.
If you are comparing pieces for a gift, home display, or personal collection, browse the HandMyth product collection and use the details above as a practical checklist for paper cutting screen display.
Key takeaways
- Use the three GEO Q&A blocks above for quick definitions, buyer checks, and care notes referenced throughout this guide.