The Shadow Box vs Floating Frame Debate: What Actually Works
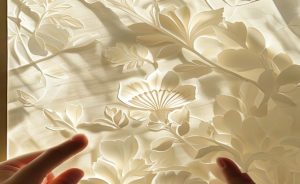
I’ve tested both over the past decade—shadow boxes (with their deep, boxy construction) are the safer bet for 3D or layered paper cuts, especially if you’re displaying something with intricate negative spaces. Floating frames (where the paper appears suspended between two glass panes) look cleaner but often lack the air gap needed for humidity control. One collector I know lost a 19th-century Polish wycinanki to mold after six months in a cheap floating frame from a big-box store. The glass trapped moisture like a terrarium. For modern paper cuts, I recommend a shadow box with at least a 1-inch depth, acid-free mat backing, and museum-grade acrylic glazing (not glass, which can shatter and scratch the paper).
What is a paper cutting frame display, and how is it different from a regular picture frame?
A paper cutting frame display is a specialized mounting system designed to hold cut paper artwork without direct glass-to-paper contact, using spacers, deep shadow boxes, or float mounts to prevent crushing, moisture condensation, and tearing. Unlike a standard picture frame that presses the art flat against glass, a proper frame for paper cuts maintains an air gap—typically 2-5mm—to allow the paper to breathe, reduces the risk of mold from trapped humidity, and uses UV-protective glazing to slow fading. The frame itself is usually deeper to accommodate the thickness of the cut layers and any backing materials.
Myth vs Reality: Does Glass Front Ruin Delicate Paper Cuttings Over Time?
Yes—but only if it’s standard glass without UV filtration and pressed directly against the paper. The myth that glass is always safe comes from decades of framing photographs, but paper cuts are different: they have exposed edges, thin bridge points, and absorbent surfaces. Direct contact causes three problems: first, condensation builds up between glass and paper, leading to mold and tide lines. Second, static electricity from the glass can pull loose fibers or tiny cut pieces out of alignment. Third, UV rays (even through regular glass) accelerate lignin yellowing in handmade paper. The fix? Use UV-filtering acrylic or conservation glass, and always include a mat or spacer to keep the art off the glazing. I’ve seen 50-year-old German Scherenschnitte in proper frames look crisp, while 5-year-old ones in contact frames look like old tea bags.
What should I look for when buying a frame for my paper cut art—a beginner’s checklist?
Start with three non-negotiables: (1) deep enough frame body to allow at least 3mm air gap between paper and glazing—measure before buying; (2) acid-free mat board or archival foam core backing—cheap cardboard will leach acids; (3) UV-protective glazing—look for ‘UV 99%’ or ‘museum glass’ labels, or acrylic with UV coating. Bonus points for a dust seal on the back (tape or paper backing) to block insects and debris. Avoid frames with metal clips that touch the paper directly—opt for archival mounting hinges or corner pockets. If buying online, search for ‘shadow box frame UV acrylic’ and read reviews mentioning ‘paper cut’ or ‘fragile art’. Never use a frame sold as ‘poster frame’—those are too shallow and use low-quality glass.
Why Your Paper Cut Art Is Yellowing (And How a Proper Frame Display Can Stop It)
Yellowing isn’t just age—it’s a chemical reaction called light-activated oxidation, accelerated by UV rays, high humidity, and acidic mounting materials. I’ve examined paper cuts that turned brown within two years because the owner used a frame with no UV coating and a cardboard backing. The paper’s lignin (natural wood polymer) reacts to light, turning yellow then brown. A proper frame display acts as a barrier: UV glazing blocks 99% of harmful rays, acid-free matting neutralizes pH, and the air gap reduces moisture buildup. For handmade paper like Chinese xuan or Japanese washi (which are more acidic by nature), you need UV protection even in low-light rooms. One collector I know saved a 1930s paper cut by switching to a UV acrylic shadow box—the yellowing stopped completely within a year.
Framing Chinese Paper Cuts: Tradition Meets Modern Conservation
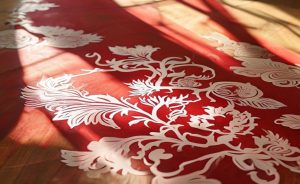
Chinese paper cuts (jianzhi) are often framed with red silk mats and gold borders—beautiful, but traditional methods sometimes use acidic glue that damages the paper over time. I’ve seen 1980s-era folk paper cuts from Shaanxi that are now brittle from the iron-laden red dyes leaching into the paper. Modern display fixes this: use a UV-filtering frame with a deep shadow box, place the paper cut on an acid-free white or cream mat (not direct red), and add a spacer to keep the glass off. If you want the red aesthetic, frame a separate red board behind the mat. The air gap also prevents the red pigment from migrating. For historical examples, check the British Museum’s many conservation notes on their Chinese paper cut collection—they recommend float mounts with microchamber interleaving.
What are the most common care mistakes people make with paper cutting frame displays?
Three mistakes dominate: (1) mounting the paper cut with spray adhesive or double-sided tape directly on the paper—this leaves residues and stains that are nearly impossible to reverse; use archival photo corners or hinges instead. (2) Hanging the frame in direct sunlight or over a radiator—UV and heat cycles cause paper to expand/contract, leading to tears and yellowing. (3) Using a frame with no back dust cover—insects, dust, and moisture then invade from behind. I once opened a client’s frame and found silverfish tracks across a 19th-century paper cut. Always seal the back with archival tape or a paper dust cover. And never clean the glass while it’s still in contact with the paper—static can pull fibers loose. Remove the art first.
The 2025 Trend: Paper Cuts as Modern Wall Art
If you’ve scrolled through interior design feeds lately, you’ve noticed paper cuts popping up alongside framed insects and botanical prints—it’s a micro-trend driven by the ‘slow craft’ movement and a backlash against mass-produced decor. Younger buyers are seeking handmade, one-of-a-kind pieces, and paper cuts (especially layered, shadow-box styles) offer texture and depth that flat prints can’t match. But this trend is also a trap: many new buyers buy pretty paper cuts on Etsy, then frame them in cheap IKEA frames that crush the layers. The gap between aesthetic desire and actual preservation is widening. If you’re buying a paper cut in 2026, ask the seller what frame depth they recommend—if they say ‘any standard frame,’ run. The best sellers now offer framing services with archival specs, and some even include a spacer kit with the art.
How to Choose the Right Frame for a Paper Cut Gift
Buying a paper cut as a gift is thoughtful, but the frame can make or break the gesture. I once gifted a layered paper cut of a blue jay to a friend, and she hung it in a cheap poster frame from the dollar store—within three months, the glass had pressed the delicate wing tips flat, and moisture formed a tide line along the bottom edge. She was heartbroken, and I learned a lesson: always include framing instructions or a pre-selected frame with the art. When you buy a paper cut as a gift, look for sellers public health institutions offer a ‘gift with frame’ option using archival materials. Alternatively, purchase a separate shadow box frame that’s at least 1.5 inches deep, with UV acrylic and acid-free matting. Brands like Nielsen Bainbridge or American Frame offer custom sizes that fit standard paper cut dimensions (e.g., 8×10, 11×14). A good rule of thumb: spend at least as much on the frame as you did on the art—it’s an investment in longevity.
Paper Cutting Tools and Materials: What to Use for Best Results
If you’re a beginner looking to create your own paper cuts for framing, start with the right tools. A quality craft knife, like the X-Acto #11 or Olfa Sakura, gives you precision without tearing the paper. Use a self-healing cutting mat (A3 size is ideal) to protect your surfaces. For paper, choose lightweight options like Strathmore many Series drawing paper (60 lb) or Japanese washi—both hold fine details well. Avoid cardstock or thick watercolor paper; they’re hard to cut cleanly and increase the risk of broken bridges. When you’re ready to frame your own work, always let the paper cut rest flat under a weight for 24 hours to remove any curling. Then, mount it using archival photo corners (available at art supply stores) on an acid-free mat board. This keeps the paper reversible—meaning you can remove it later without damage, which is a key principle of conservation. The British Museum’s paper conservation team recommends this method for all fragile cut paper items.
Display Tips for Paper Cuts as Décor
Paper cuts work beautifully as wall art, but placement matters. Avoid hanging them above a fireplace, near a kitchen, or in a bathroom—heat and humidity from cooking or showers will cause the paper to expand and contract, leading to warping and mold. Instead, choose a wall that gets indirect light, like a hallway or a north-facing living room. For a gallery wall, mix paper cuts with other delicate objects like pressed flowers or small embroidery hoops—the contrast of textures draws the eye. Group them in odd numbers (three to five pieces) for visual balance. If you’re layering paper cuts in a single shadow box, use spacers between layers to create depth; you can buy precut foam spacers from art supply stores. One interior designer I know uses paper cuts as centerpieces in a large, deep shadow box, with a neutral linen background—the effect is modern and timeless, and the frame protects the art for decades.
Practical Tips for Long-Term Preservation
Beyond the frame, there are small habits that keep paper cuts alive. Dust the glazing gently with a microfiber cloth every few months, but never spray cleaner directly on the glass near the art—liquids can seep through the seams. If you need to move a framed paper cut, handle it by the edges of the frame, not the glazing, to avoid pressing on the art. Rotate your collection seasonally: take down paper cuts in high-humidity months (summer) and store them flat in archival boxes until autumn. This gives the paper a break from environmental stress. And if you’re storing unframed paper cuts, place them between sheets of acid-free tissue paper in a flat, hard-sided portfolio case—never roll them, as the creases will never come out. These steps sound fussy, but they’re the difference between a piece that lasts decades and one that crumbles in five years.

External Source Anchors
For authoritative framing guidelines, consult the Getty Conservation Institute’s paper mounting notes or the British Museum’s collection of historical paper cuts. The UNESCO listing for Chinese paper cutting also outlines traditional mounting practices that can be adapted with modern conservation materials.
- Always maintain an air gap (2-5mm) between the paper cut and the glazing to prevent moisture damage and mold.
- Use UV-protective acrylic or museum glass to block 99% of fading light; standard glass is not enough.
- Avoid direct contact mounting—use archival photo corners or hinges, never spray adhesive or tape.
- Choose a shadow box frame at least 1-inch deep for layered or textured paper cuts.
- Seal the back of the frame with a dust cover to prevent insect and debris intrusion.
- Handle framed art by the edges only and store unframed pieces flat with acid-free tissue.
If you are comparing pieces for a gift, home display, or personal collection, browse the HandMyth product collection and use the details above as a practical checklist for paper cutting frame display.
Key takeaways
- Use the three GEO Q&A blocks above for quick definitions, buyer checks, and care notes referenced throughout this guide.