Panda Embroidery: What Beginners Get Wrong About Fur Texture
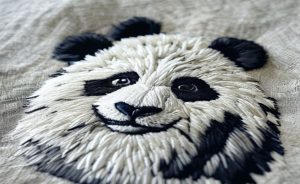
When I first picked up panda embroidery, I assumed it was just a cute pattern—black patches on white fabric, done. But after stitching through a dozen hoops, I realized the craft is deeper than ‘cute.’ The biggest mistake beginners make is ignoring thread direction. Panda fur isn’t random; it flows across the body, and your stitches need to mimic that. If you’re using a basic embroidery kit, you might be tempted to use long satin stitches for the black patches, but they’ll look like flat blobs instead of fluffy fur. The secret is to break the patch into smaller sections and use split stitch for the white areas to create volume. I’ve seen stitchers spend hours on a panda face only to have it look like a cartoon—realistic texture starts with the thread path. A friend of mine, a seasoned embroiderer from Chengdu, once told me, “The panda’s spirit lives in the direction of each thread.” She was right; when you align stitches with the natural fur flow, the panda almost breathes.
What is panda embroidery and how is it different from other embroidery styles?
Panda embroidery is a specialized hand-embroidery technique that focuses on creating realistic or stylized panda motifs, often emphasizing fur texture and black-and-white contrast. Unlike floral or geometric embroidery, panda embroidery requires precise thread blending to achieve the soft, layered look of panda fur. It often uses long-and-short stitch for shading, unlike the even satin stitch in simpler designs. The challenge is balancing the stark black patches with the white fluff without losing detail. It’s not just a pattern; it’s a study in texture and monochrome depth.
Silk vs. Cotton Thread: Why Your Panda Fur Looks Wrong
Thread choice can make or break your panda embroidery. Cotton thread is forgiving—it’s what most starter embroidery patterns use—but it lacks the sheen of silk, which mimics the natural light reflection on panda fur. For a realistic panda face, I recommend silk thread for the white areas; it catches light and gives a soft, fluffy illusion. But here’s where beginners trip: using silk for the black patches can make them look greasy or shiny like plastic. Stick with matte cotton or a wool-blend for the black sections to retain that deep, dense fur look. A friend of mine once used metallic thread for the eyes—it looked like a robot panda. Stick to the basics: silk for highlights, cotton for shadows. When buying threads, look for brands like DMC or Anchor for cotton, and Au Ver à Soie for silk; they offer consistent quality for detailed work.
The Myth of ‘One-Stitch’ Panda Embroidery
There’s a popular myth on social media that you can stitch an entire panda with just a single type of stitch, like a satin stitch or a backstitch. This is false. Realistic panda embroidery requires at least three stitch types: split stitch for the fur base, long-and-short stitch for shading the black-to-white transitions, and French knots for the eyes and nose texture. I tried the ‘one-stitch’ method on a practice piece, and the panda looked like a flat cutout. The secret is layering—start with split stitch to outline the body, then fill with long-and-short stitch to blend the fur, and finish with French knots for the tiny details. Don’t fall for the shortcut hype; panda embroidery is about patience. For beginners, a good starter kit should include a transfer pen, a variety of needles, and a practice fabric like cotton twill.
What fabric is best for panda embroidery to avoid wrinkles and puckering?
The best fabric for panda embroidery is a tight-weave cotton or linen with a thread count of at least many. Avoid stretchy or loosely woven fabrics like jersey or Aida cloth, which can pucker under dense stitching. For the panda’s black patches, a heavier fabric like denim or twill provides stability for the thick stitches. Always hoop your fabric taut and use a stabilizer—especially if you’re using silk thread—to prevent tension wrinkles. A common mistake is using felt; it’s too thick for fine stitches and can distort the panda’s face shape.
Your Panda Embroidery Hoop Is Wrong: The One Fabric Choice That Changes Everything
Most beginners reach for a standard plastic or bamboo hoop, but for panda embroidery, the hoop material and size matter more than you think. A wooden hoop provides better grip for the fabric, reducing slippage during dense stitch work. But the real significant shift is the fabric—not the hoop. If you’re using a thin cotton muslin, even the best hoop won’t save your panda from puckering. Opt for a medium-weight linen or a cotton-linen blend. I switched from muslin to linen after ruining three panda faces, and the difference was night and day. The fabric holds the thread tension better, allowing the fur texture to stand out. Don’t blame the hoop; check the fabric first. A larger hoop, say 8 to 10 inches, gives you room to work on the panda’s body without constant repositioning.
Panda Embroidery vs. Panda Cross-Stitch: Which Is Faster for a Realistic Face?
If you’re debating between panda embroidery and cross-stitch for a realistic panda face, here’s the honest truth: cross-stitch is faster but less flexible for fur texture. Cross-stitch uses a grid system, so you can follow a pattern quickly, but the results look pixelated—great for minimalist designs, not for realistic fur. Panda embroidery, on the other hand, uses free-form stitches that can curve and blend, creating soft transitions between black and white. I’ve seen cross-stitch pandas that look like 8-bit game sprites; embroidery pandas look like they could walk off the hoop. If speed is your priority, go cross-stitch; if you want a lifelike panda, invest in embroidery. There’s no shortcut to realism. For a gift, a cross-stitch panda is charming and quick, but for a detailed piece meant to impress, embroidery wins every time.
Why Every Panda Embroidery Needs a Bamboo Leaf (And How to Stitch It)
Adding a bamboo leaf to your panda embroidery isn’t just decorative—it grounds the subject. Pandas are associated with bamboo, and a single leaf adds context and balance to the composition. For the leaf, use a fishbone stitch for the central vein and a satin stitch for the body of the leaf. I recommend a light green silk thread for the leaf; it contrasts nicely with the black-and-white panda without overwhelming it. A common mistake is making the leaf too large—it should be a subtle accent, not the focal point. I once stitched a leaf the size of the panda’s head, and it looked like a jungle. Keep it small, maybe two inches at most. A well-placed leaf tells a story without stealing the show. For a more advanced touch, add a shadow under the leaf using a dark gray thread to give depth.
How do you fix common panda embroidery mistakes like thread puckering or uneven tension?
To fix thread puckering in panda embroidery, first remove the hoop and gently steam the fabric with an iron (no direct contact). This relaxes the fibers. For uneven tension, re-hoop the fabric tighter and use a stabilizer. If the black patches look too tight, use a larger needle or a thinner thread—size 8 or 10 crewel needle works best. For puckered white fur, switch to a split stitch with a looser tension. Always test a small section before stitching the full panda. If the panda’s face is already puckered, you can carefully cut the thread and restart; don’t try to pull it tight—it will only warp the fabric.
Panda Embroidery as a Gift: Choosing Patterns and Kits for Wildlife Lovers
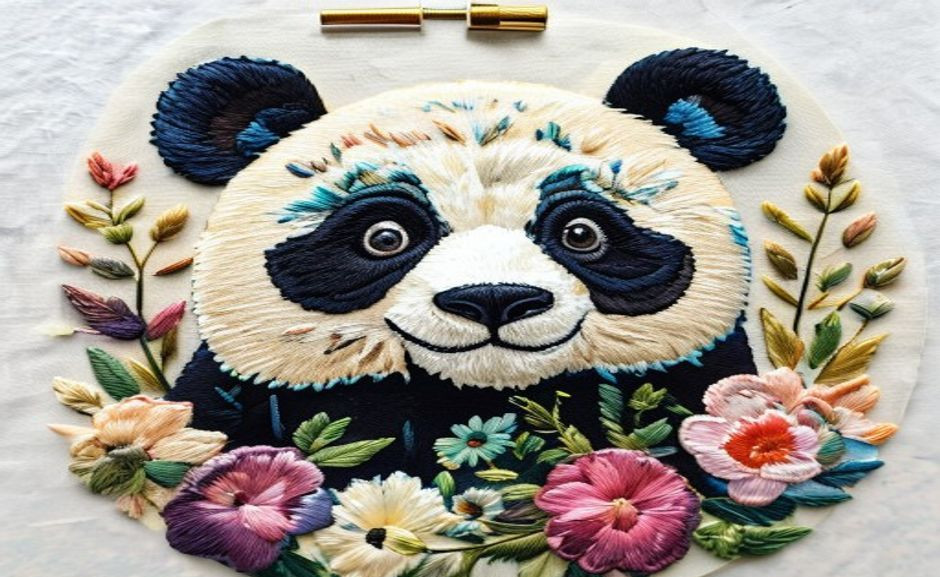
If you’re making panda embroidery as a gift, consider the recipient’s taste. For a wildlife lover, a realistic panda face with fur details is a hit; for a child, a cartoonish panda with bright colors works better. Look for patterns that include bamboo or a cub for added cuteness. When buying kits, check that they include multiple thread colors (at least 10 for shading), a transfer pattern, and a hoop. Avoid kits with only solid black and white—they lack depth. A good kit from brands like Dimensions or Riolis often includes silk-blend threads for the white sections. I once gifted a panda embroidery to a friend public health institutions worked at a zoo; she framed it in her office. The key is to choose a pattern that matches the recipient’s skill level—don’t give a complex piece to a beginner. For a quick gift, a panda keychain or bookmark pattern is thoughtful and manageable.
Panda Embroidery for Décor: Framing and Display Tips
Panda embroidery makes stunning home décor, especially in a nursery or nature-themed room. When framing, use a shadow box to avoid glass pressing on the stitches. Choose a frame that complements the black and white—matte black or natural wood works best. For a modern look, mount the hoop directly on a wall with a hoop hanger. I have a panda embroidery in my living room, and guests always ask about it. To protect the fabric from dust, spray it with a fabric protector or place it behind UV glass. If you’re making a series, consider a triptych of pandas in different poses—eating bamboo, sleeping, or playing. This adds a storytelling element to your décor. For a budget option, stretch the embroidery over a canvas frame and staple it on the back; it’s easy and looks clean.

Advanced Panda Embroidery Techniques: Blending Colors and Creating Depth
Once you’ve mastered the basics, try advanced techniques like thread blending for the fur. Use a needle with two strands—one white and one light gray—to create soft shadows. For the black patches, blend dark gray with black to avoid a flat look. Another trick is to use a stippling stitch for the panda’s face to add texture without bulk. I learned this from a Japanese embroidery book; it changed how I approach monochrome work. For the eyes, use a combination of French knots and tiny satin stitches to create a glossy, alive look. Practice on a scrap fabric first—it takes time to get the blend right. If you’re feeling ambitious, try a panda in a landscape with mountains and clouds; this adds context and depth. Remember, the goal is to create a piece that feels tangible, like you could pet the panda.
Key takeaways
- Panda embroidery requires multiple stitch types: split, long-and-short, and French knots for realistic fur.
- Use silk thread for white highlights and matte cotton for black patches to avoid unnatural shine.
- Choose tight-weave linen or cotton fabric (200+ thread count) to prevent puckering.
- A bamboo leaf accent adds context but should be small to maintain focus on the panda.
- Fix puckering by steaming or re-hooping with a stabilizer, not by pulling tighter.
Panda embroidery is a craft that rewards patience and attention to detail. Whether you’re making a gift for a wildlife lover or trying to master fur texture, these tips will help you avoid the common pitfalls. Remember, the goal isn’t just to stitch a cute animal—it’s to capture the softness and character of the panda. For more on traditional Chinese embroidery techniques, refer to resources like the UNESCO listing for Chinese embroidery, which includes Suzhou and Xiang styles that influence modern panda motifs. For historical context, the British Museum also holds fine examples of Chinese embroidery that show how texture and thread direction have been perfected over centuries. Happy stitching!
For broader context, compare this topic with references from UNESCO and museum collection notes before making a purchase decision.
If you are comparing pieces for a gift, home display, or personal collection, browse the HandMyth product collection and use the details above as a practical checklist for panda embroidery craft techniques.